


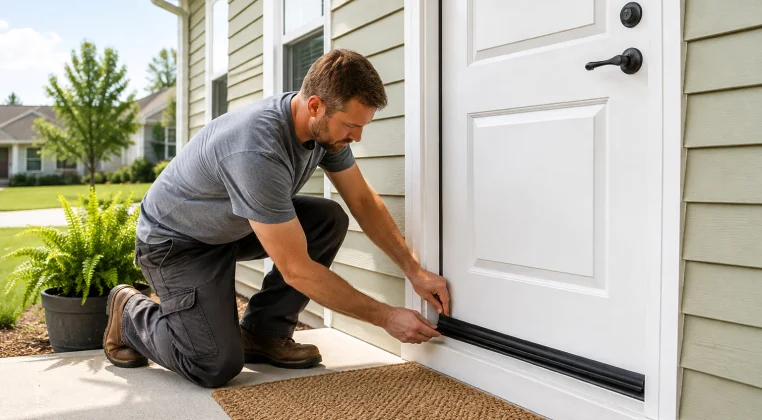
Gaps around a door can let outdoor air, dust, moisture, insects, and noise pass through an opening that should be properly sealed. You may notice a cold draft near your front door in winter, warm air entering an air-conditioned room in summer, daylight under a garage door, or worn pile weatherstripping along a sliding patio door.
Installing the right weatherstripping can help close these gaps, but the installation method depends on the type of door and where the gap occurs. An exterior entry door may need compression weatherstrip around the jambs and a door sweep at the bottom, while a sliding door may use pile weatherstripping and a garage door may require separate seals along the top, sides, and bottom.
This step-by-step guide explains how to install door weatherstrip, how to find gaps before you begin, and how installation differs across exterior doors, sliding doors, garage doors, and commercial door systems.
How to Find Air Gaps Around a Door?

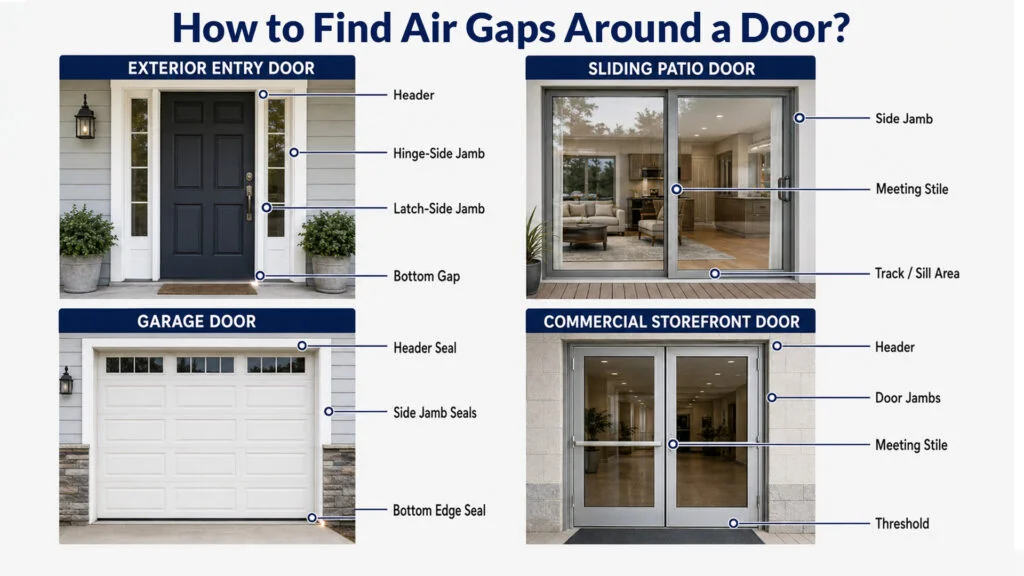
1. Check from where Daylight seeps?
Close and latch the door during daylight hours. Look around the top, both sides, corners, and bottom. A visible line of light often points to an incomplete seal. For garage doors, inspect the entire bottom edge and both vertical sides. For sliding doors, check where the moving panel meets the jamb and where the sliding and fixed panels overlap.Inspect the Existing Weatherstrip
Look closely for:- Cracks or tears
- Flattened sections
- Missing pieces
- Hardened rubber or vinyl
- Loose adhesive
- Worn pile fibers
- Bent retainers
- Sections pulling away from the frame
2. Try the Paper Test
For hinged entry doors, place a sheet of paper between the door and weatherstrip. Close and latch the door, then pull the paper. You should feel some resistance where the seal is making contact. If the paper slides freely from one section but grips firmly elsewhere, the compression may be uneven.3. Check Door Alignment
Weatherstripping cannot correct every gap. Check for loose hinges, sagging doors, damaged rollers, uneven garage door closure, worn thresholds, or panels that no longer sit correctly in their frames. If the gap is dramatically wider in one area than another, correct the underlying alignment issue before adding a thicker weatherstrip.How to Choose the Right Weatherstripping for Your Door?
There is no single weatherstrip that works for every door. Start with the door type and gap location.| Door Type | Common Gap Locations | Common Sealing Options |
| Exterior entry door | Header, jambs, bottom | Compression weatherstrip, kerf seal, door sweep, door bottom |
| Sliding patio door | Jambs, meeting stile, track | Pile weatherstrip, brush seal, compatible sliding door seal |
| Garage door | Header, sides, bottom | Perimeter weather seal, garage door bottom seal |
| Commercial/storefront door | Header, jambs, threshold | Brush seals, pile seals, door sweeps, automatic door bottoms |
Compression Weatherstrip
Rubber, vinyl, silicone, or similar flexible seals compress when a door closes. These are commonly used around the header and jambs of hinged entry doors. Depending on the product, they may be adhesive-backed, screw-mounted, installed in a retainer, or pressed into an existing groove.Kerf Weatherstrip
Many residential door frames have a narrow groove, called a kerf, along the jamb. A compatible weatherstrip has a rigid or barbed section that presses into this groove, while the flexible section compresses against the closed door. If you are replacing an existing kerf seal, remove a small section first and compare its profile, stem dimensions, and compression section with the replacement.Foam Weatherstrip
Adhesive-backed foam can be used for certain small gaps and light-duty applications.The mounting surface must be clean and dry for the adhesive to bond properly. Avoid choosing foam simply because it is thicker. Oversized material may make a door difficult to close.Pile and Brush Weatherstrip
Pile weatherstripping uses dense fibers attached to a narrow backing.It is commonly found in sliding doors, windows, aluminum framing, and some commercial door systems. Brush seals use flexible bristles and are also found in commercial openings and certain door-bottom applications.Door Sweeps and Door Bottoms
Gaps beneath a door usually need a bottom-sealing component rather than the same door weatherstrip used around the jambs. Common choices include:- Surface-mounted door sweeps
- U-shaped door bottoms
- Slide-on door bottoms
- Brush sweeps
- Automatic door bottoms
- Threshold seals
Thresholds and Threshold Inserts
The threshold sits across the floor at the bottom of the doorway and works with the door bottom or sweep. Some thresholds have replaceable sealing inserts. If the threshold itself is still in usable condition but the vinyl or rubber insert is worn, replacing the insert may be enough. Check out our blog on how to DIY weatherstripping with CRLTools You’ll Need to Install Door Weatherstripping
The exact tools depend on the weatherstrip and door, but a typical installation may require:- Tape measure
- Utility knife or scissors
- Screwdriver or drill
- Cleaning cloth
- Mild cleaner
- Putty knife or scraper
- Pencil
- Pliers
- Manufacturer-specified fasteners
- Replacement weatherstrip
How to Install Weatherstripping on an Exterior Door?
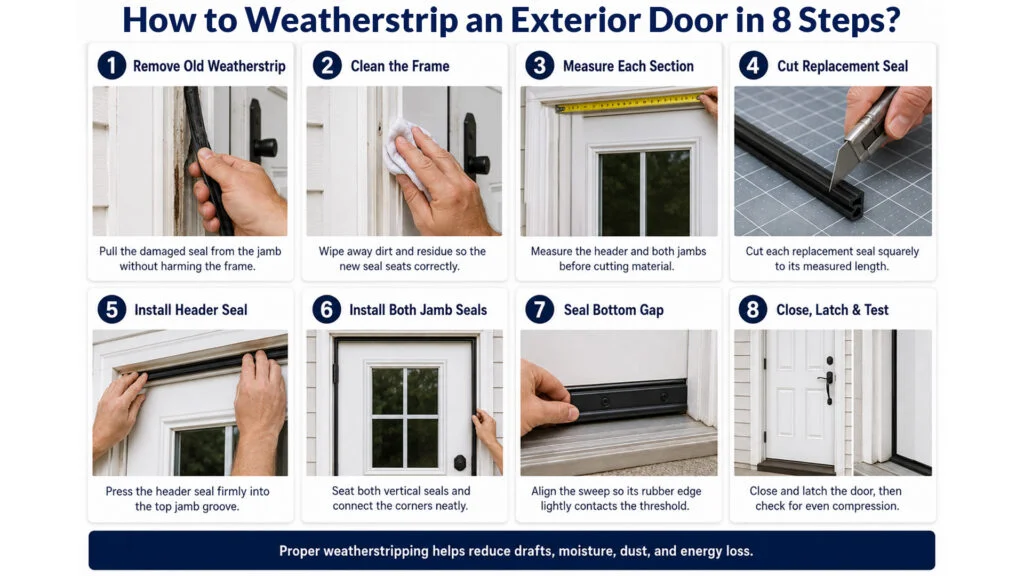
Step 1: Remove the Old Weatherstripping
Start by identifying how the existing weatherstrip is attached. Adhesive-backed weatherstrip can usually be peeled away carefully. Kerf weatherstrip pulls from the groove in the jamb. Screw-mounted seals require removal of the fasteners and retainer. Remove old adhesive and loose material, but avoid damaging the door frame or any reusable mounting channel.Step 2: Clean the Door Frame
Clean the area where the new weatherstrip will be installed. Remove dirt, grease, dust, old adhesive, and loose paint. Allow the surface to dry fully before installing adhesive-backed material. Skipping this step can cause adhesive weatherstripping to loosen prematurely.Step 3: Measure the Door Frame
Start by measuring each section separately:- Header
- Hinge-side jamb
- Latch-side jamb
Step 4: Cut the New Weatherstrip
Measure again before cutting each section. Avoid stretching flexible weatherstrip while measuring or installing it. Material that is stretched during installation may contract later and leave openings near the corners. Plan how the header and jamb pieces will meet so there are no open corner gaps.Step 5: Install Weatherstripping Along the Top
Install the header section according to the mounting method. For adhesive-backed weatherstrip, remove a small amount of backing at a time and press the strip gradually into position. For kerf weatherstrip, press the mounting stem firmly into the existing groove. For screw-mounted seals, position the retainer according to the manufacturer’s instructions before fastening it. The seal should make contact with the closed door without requiring excessive force to compress.Step 6: Install Weatherstripping Along the Door Jambs
Install the vertical sections along both sides. Make sure the side pieces meet the header weatherstrip closely at the upper corners. Close the door and check contact along the full height. If the seal barely touches the door, air gaps may remain. If it compresses too much, the door may become difficult to close or latch.Step 7: Seal the Gap Under the Door
If light or airflow is visible beneath the door, inspect the existing door bottom and threshold. Depending on the opening, you may need a:- Door sweep
- Door bottom
- Automatic door bottom
- Threshold insert
- Replacement threshold
Step 8: Test the Door Seal
Close and latch the door. Check whether:- The door closes without excessive force
- The latch engages normally
- No obvious daylight remains
- Weatherstrip contacts the door consistently
- The bottom seal meets the threshold correctly
How to Weatherstrip a Sliding Door?
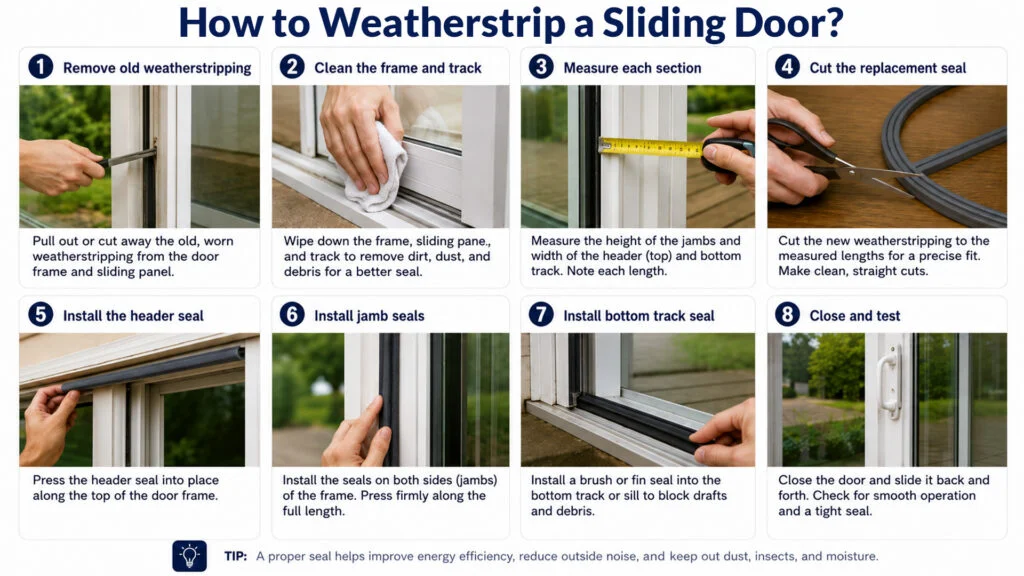
Step 1: Locate the Worn Sliding Door Seal
Open and close the sliding panel while inspecting where the seal contacts the frame and adjacent panel. Look for flattened pile, missing sections, torn seals, or areas where the panel no longer makes contact.Step 2: Identify the Existing Profile
Before removing all the old weatherstrip, take out a small section. Check:- Backing width
- Pile height
- Overall profile
- Mounting channel
- Presence of a center fin, if applicable
Step 3: Remove the Old Weatherstrip
Slide or pull the old weatherstrip from its channel according to the door design. Remove dirt and debris from the channel.Step 4: Measure and Cut the Replacement
Measure the full length of the section being replaced and cut the new seal according to manufacturer instructions.Step 5: Install the New Sliding Door Weatherstrip
Insert or slide the replacement material into the existing channel. Make sure it sits evenly along the full length.Step 6: Test the Sliding Door
Move the panel several times.The door should slide normally while the weatherstrip maintains contact. If a gap remains despite correctly sized weatherstripping, inspect the rollers and panel adjustment. A poorly positioned sliding panel may not seal correctly even with new weatherstripping.How to Weatherstrip a Garage Door?
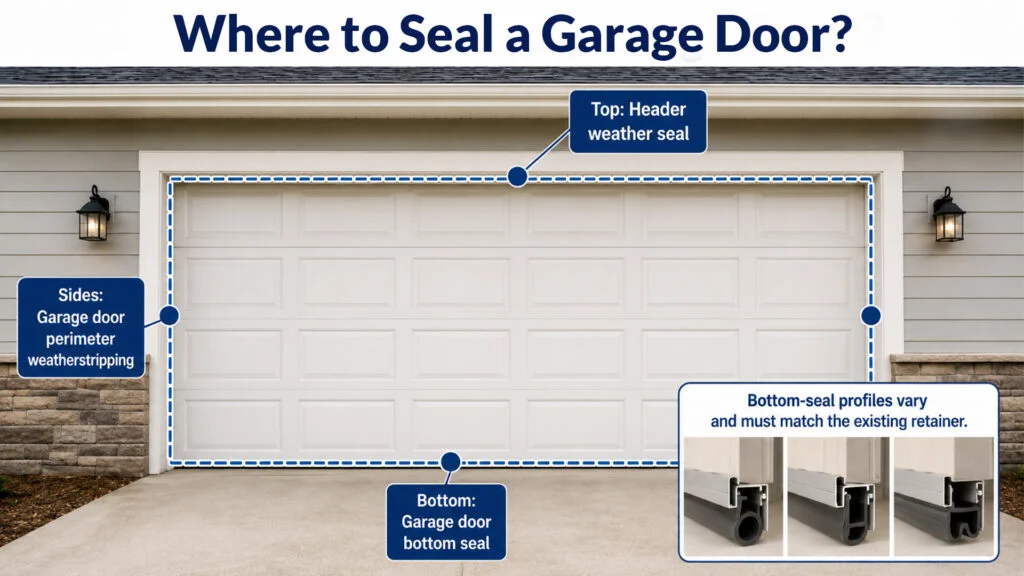
- The top of the opening
- Both vertical sides
- The bottom edge of the garage door
Step 1: Close the Garage Door and Find the Gaps
Inspect the closed door from inside the garage during daylight. Look for light entering along the sides, top, or bottom. If the gap is uneven, check whether the garage door closes evenly before replacing the seal.Step 2: Inspect the Side and Top Weather Seals
Weather seals along the garage door frame should make consistent contact with the closed door. Replace sections that are cracked, hardened, loose, or no longer touching the door. Measure the top and both sides before purchasing replacement material.Step 3: Inspect the Garage Door Bottom Seal
The bottom seal attaches to or fits into the lower edge of the garage door. Garage door bottom seals come in different profiles, including T-shaped, bulb-style, and U-shaped configurations. Do not buy a replacement based only on the width of the garage door. Check the existing retainer and seal profile first.Step 4: Remove the Old Bottom Seal
The removal method depends on the garage door system. Some seals slide out of a retainer, while others use a different attachment method. Clean the retainer before inserting the replacement. If the retainer is bent, corroded, or damaged, it may also need attention.Step 5: Install the Replacement Seal
Install the new seal according to the manufacturer’s instructions. Make sure it runs continuously across the width of the door.Step 6: Close and Inspect the Garage Door
Lower the garage door fully. The bottom seal should make consistent contact with the floor without preventing the door from closing properly. Inspect the sides and header again for daylight.How to Weatherstrip Commercial and Storefront Doors?
Commercial and storefront doors may use different sealing systems than residential entry doors. Start by inspecting the existing door system and identifying how each seal is mounted. Common components include:- Brush weatherstripping
- Pile seals
- Perimeter seals
- Door sweeps
- Automatic door bottoms
- Thresholds
Door Sweeps, Door Bottom or Threshold Which One Do You Need?
These components all help address gaps near the bottom of a door, but they work differently.| Component | Installation Area | What It Does |
| Door sweep | Lower face of door | Uses a flexible seal or brush to close the gap near the floor or threshold |
| Door bottom | Bottom edge of door | Fits onto, around, or into the lower portion of the door |
| Automatic door bottom | Bottom of door | Lowers a seal when the door closes and retracts when opened |
| Threshold | Floor of doorway | Provides the lower contact surface and transition |
| Threshold insert | Within compatible threshold | Replaces a worn flexible sealing section |
Common Door Weatherstripping Installation Mistakes
Even a small installation error can leave part of the doorway unsealed.1. Using the Same Weatherstrip for Every Door
A hinged entry door, sliding patio door, garage door, and storefront door may use completely different sealing systems. Identify the door and existing mounting method first.2.Buying Before Measuring
Measure the gap and existing seal. For pile, kerf, garage door bottom seals, and channel-mounted products, profile dimensions matter as much as overall length.3. Choosing the Thickest Seal
Thicker does not automatically mean better. An oversized seal can make an entry door difficult to latch, increase resistance on a sliding door, or interfere with proper operation.4. Installing Adhesive Weatherstrip on a Dirty Surface
Dust, grease, moisture, and loose paint can prevent adhesive-backed weatherstrip from bonding correctly.5. Stretching Flexible Weatherstrip
Do not pull flexible material tight during installation.It may contract later and leave gaps at the ends or corners.6. Leaving Gaps at the Corners
Check where the header and jamb seals meet.A small opening at a corner can interrupt an otherwise continuous perimeter seal.7. Ignoring Door Alignment
Weatherstripping works best when the door sits correctly in its opening. Loose hinges, worn sliding door rollers, uneven garage door closure, or damaged thresholds should be addressed before trying to compensate with thicker sealing materialWhen Should You Replace Door Weatherstripping?
There is no single replacement interval for every weatherstrip because wear depends on material, door usage, installation, sun exposure, moisture, temperature changes, and other conditions. Inspect weatherstripping when you notice:- Visible daylight around a closed door
- Drafts
- Cracks or tears
- Brittle material
- Flattened compression seals
- Worn pile
- Missing sections
- Loose adhesive
- Increased gaps around the door
- A damaged bottom seal
Frequently Asked Questions
Weatherstripping commonly runs across the header and along both side jambs where the closed door meets the frame. A gap beneath the door usually requires a door sweep, door bottom, threshold seal, or another compatible bottom-sealing component.
Measure the gap and inspect the dimensions and profile of the existing seal. For kerf, pile, channel-mounted, and garage door seals, also measure the mounting section or retainer. Compare those measurements with the manufacturer’s product specifications.
Yes. A weatherstrip that is too thick can make a hinged door difficult to close, increase friction on a sliding door, or prevent proper contact between door components.
Sliding doors commonly use pile weatherstripping, brush seals, or other profile-specific seals. The correct replacement depends on the existing door system, channel dimensions, backing width, and required pile height.
Not for every part of the opening. Garage doors often use dedicated perimeter seals and bottom seals designed for the door’s movement and retainer system. Match the replacement to the existing installation.
Possible causes include an incorrectly sized seal, poor positioning, open corner joints, a worn threshold, door sag, sliding panel misalignment, or an uneven garage door. Find the exact remaining gap before adding more sealing material.