How to Install a Pet Door (Step-by-Step Guide for Every Home)

Giving your pet the freedom to move in and out of the house can make life easier for both of you. A properly installed pet door saves you from constant trips to open the door, while helping your dog or cat enjoy independence, exercise, and access to the outdoors.
Pet doors today come in many styles - traditional door-mounted models, sturdy wall-mounted options, removable sliding glass door panels, and even renter-friendly designs that don’t require cutting into walls. Each type has its own installation process, level of difficulty, and tools required.
In this guide, we’ll walk through how to install a pet door step by step. Whether you want to cut into a standard door, create a tunnel through a wall, or add a no-cut panel for your sliding door, this guide will help you choose the right approach and avoid common mistakes.
By the end, you’ll know everything needed for a smooth pet door installation, from the right tools to step-by-step instructions for each type of setup.
How to Install a Door-Mounted Pet Door - Step-by-Step
Installing a pet door in an existing wood, metal, or composite door is the most common approach. It’s a manageable project for most DIYers and can usually be completed in under two hours. Before you start cutting, it’s worth double-checking that the door is suitable and that the dog door you purchased matches the door’s thickness.
Door- Mounted Pet Door - Installation Steps
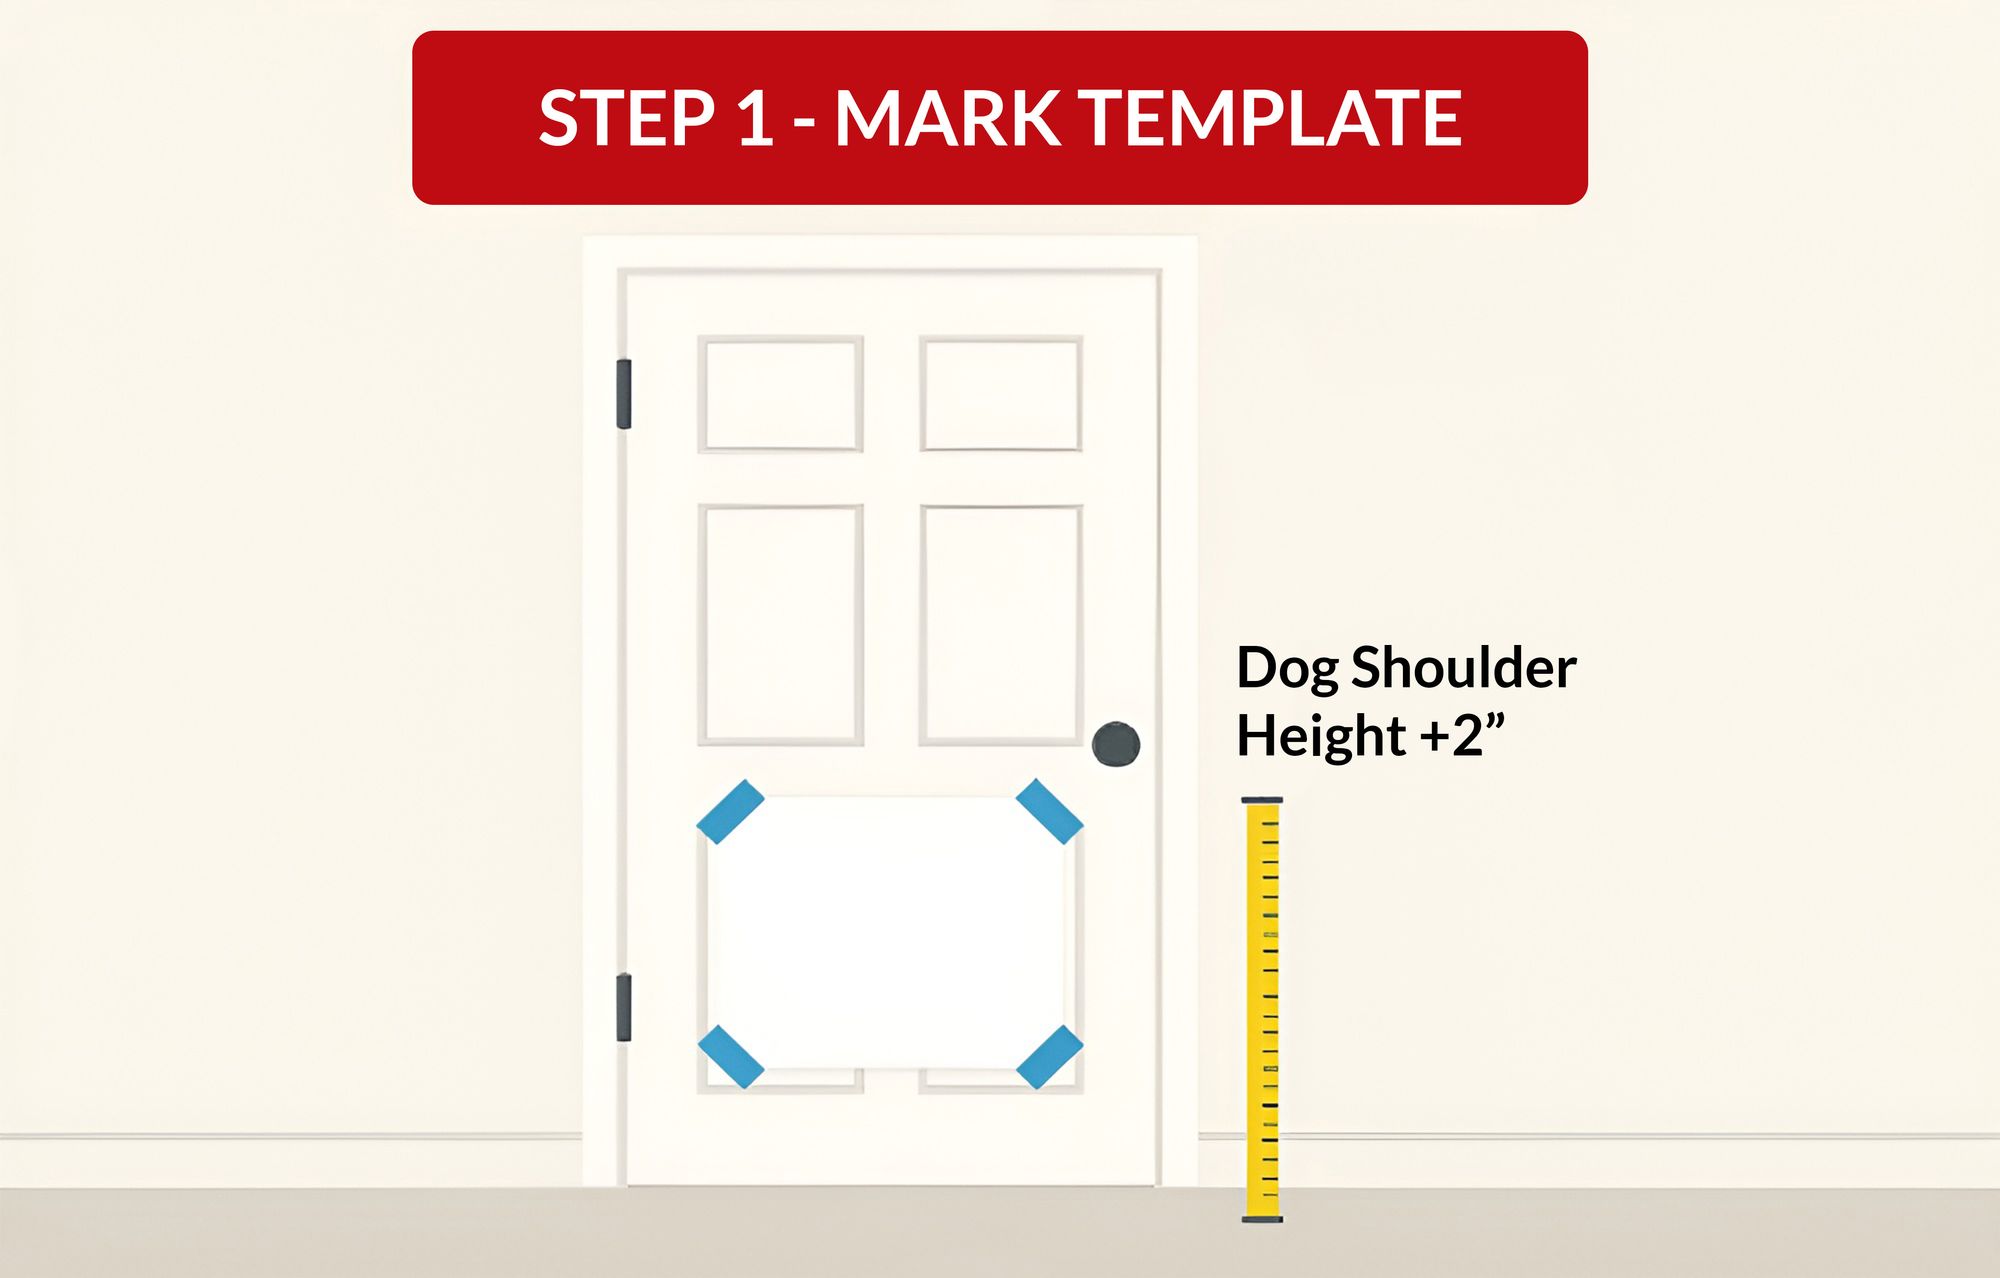
Step 1 - Mark the template at the correct height
Tape the manufacturer’s template onto the door. Ensure it’s level and centered. Double-check height before moving forward.
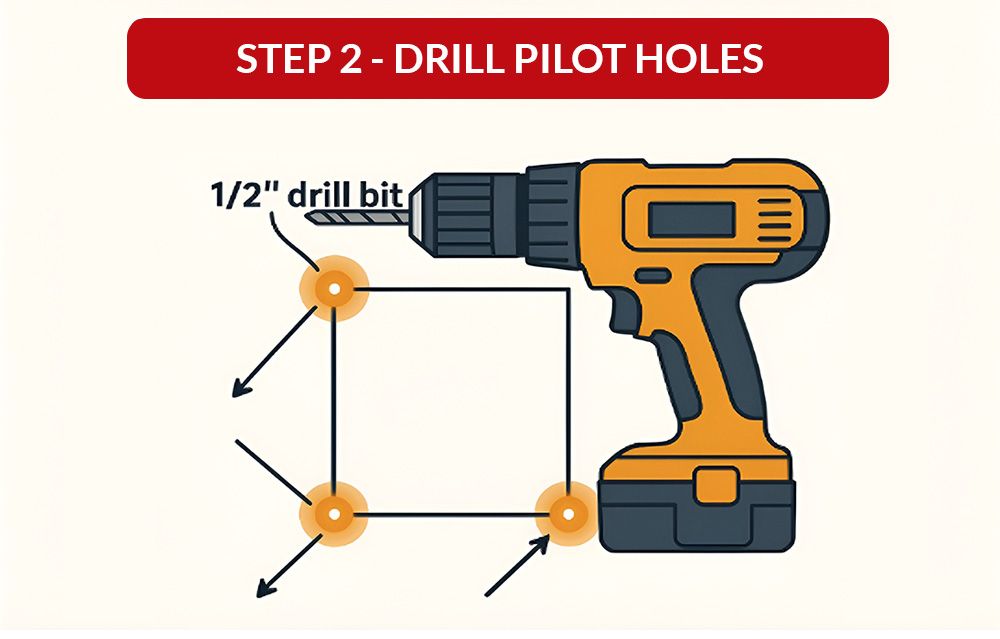
Step 2 - Drill pilot holes in the corners
Use a drill with a ½-inch bit to create holes at each corner of the outline. These holes guide your saw and prevent over-cutting.
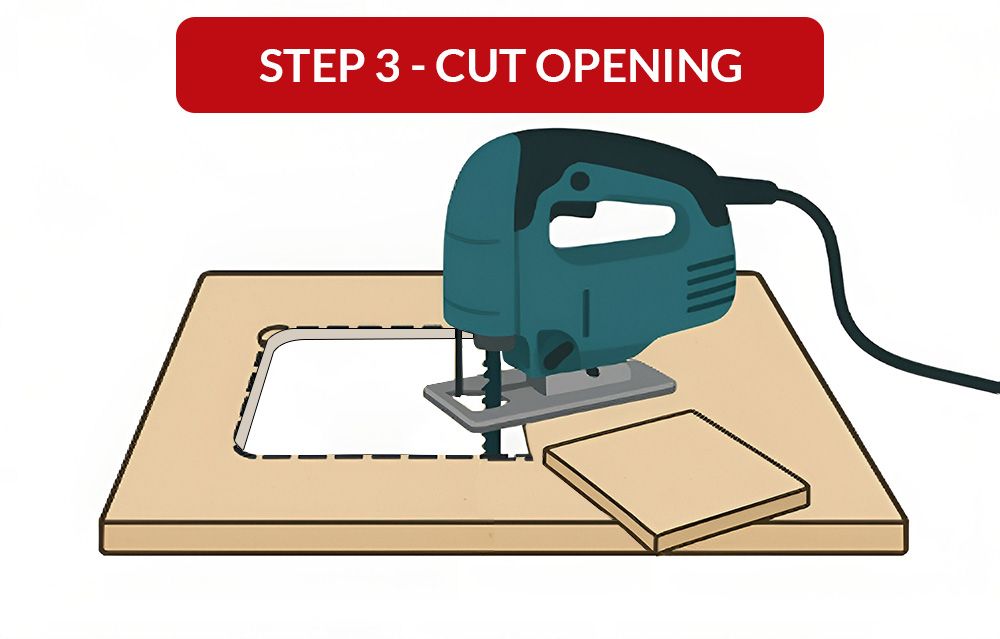
Step 3 - Cut the opening with a jigsaw
Insert the blade into one of the pilot holes and carefully cut along the template line. Take your time for a clean cut, especially on steel-skinned doors.
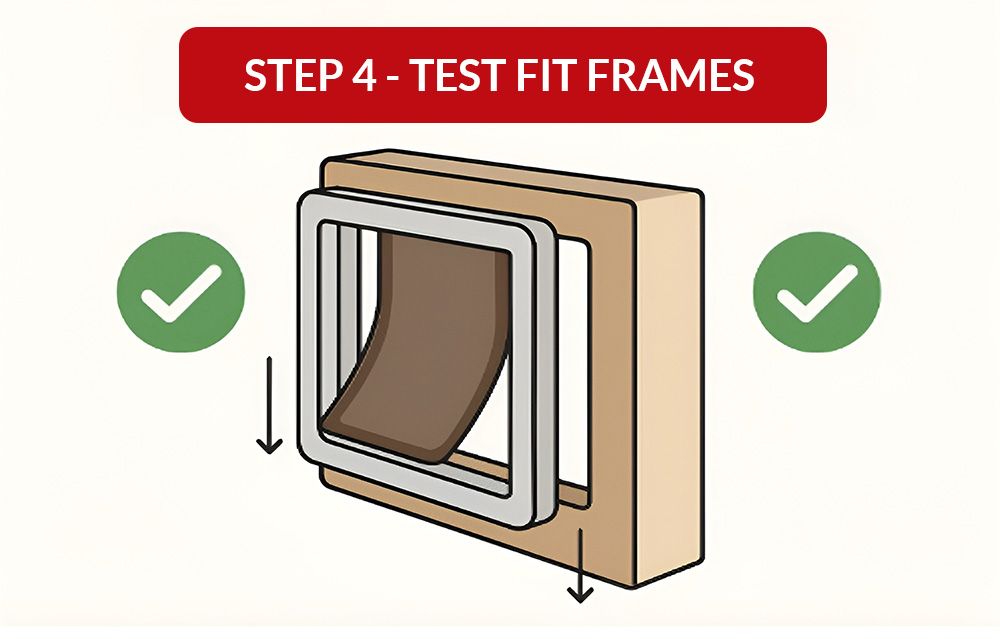
Step 4 - Test fit the frames
Slide the interior and exterior frames into place. The fit should be snug without forcing. If the opening is tight, sand the edges lightly.
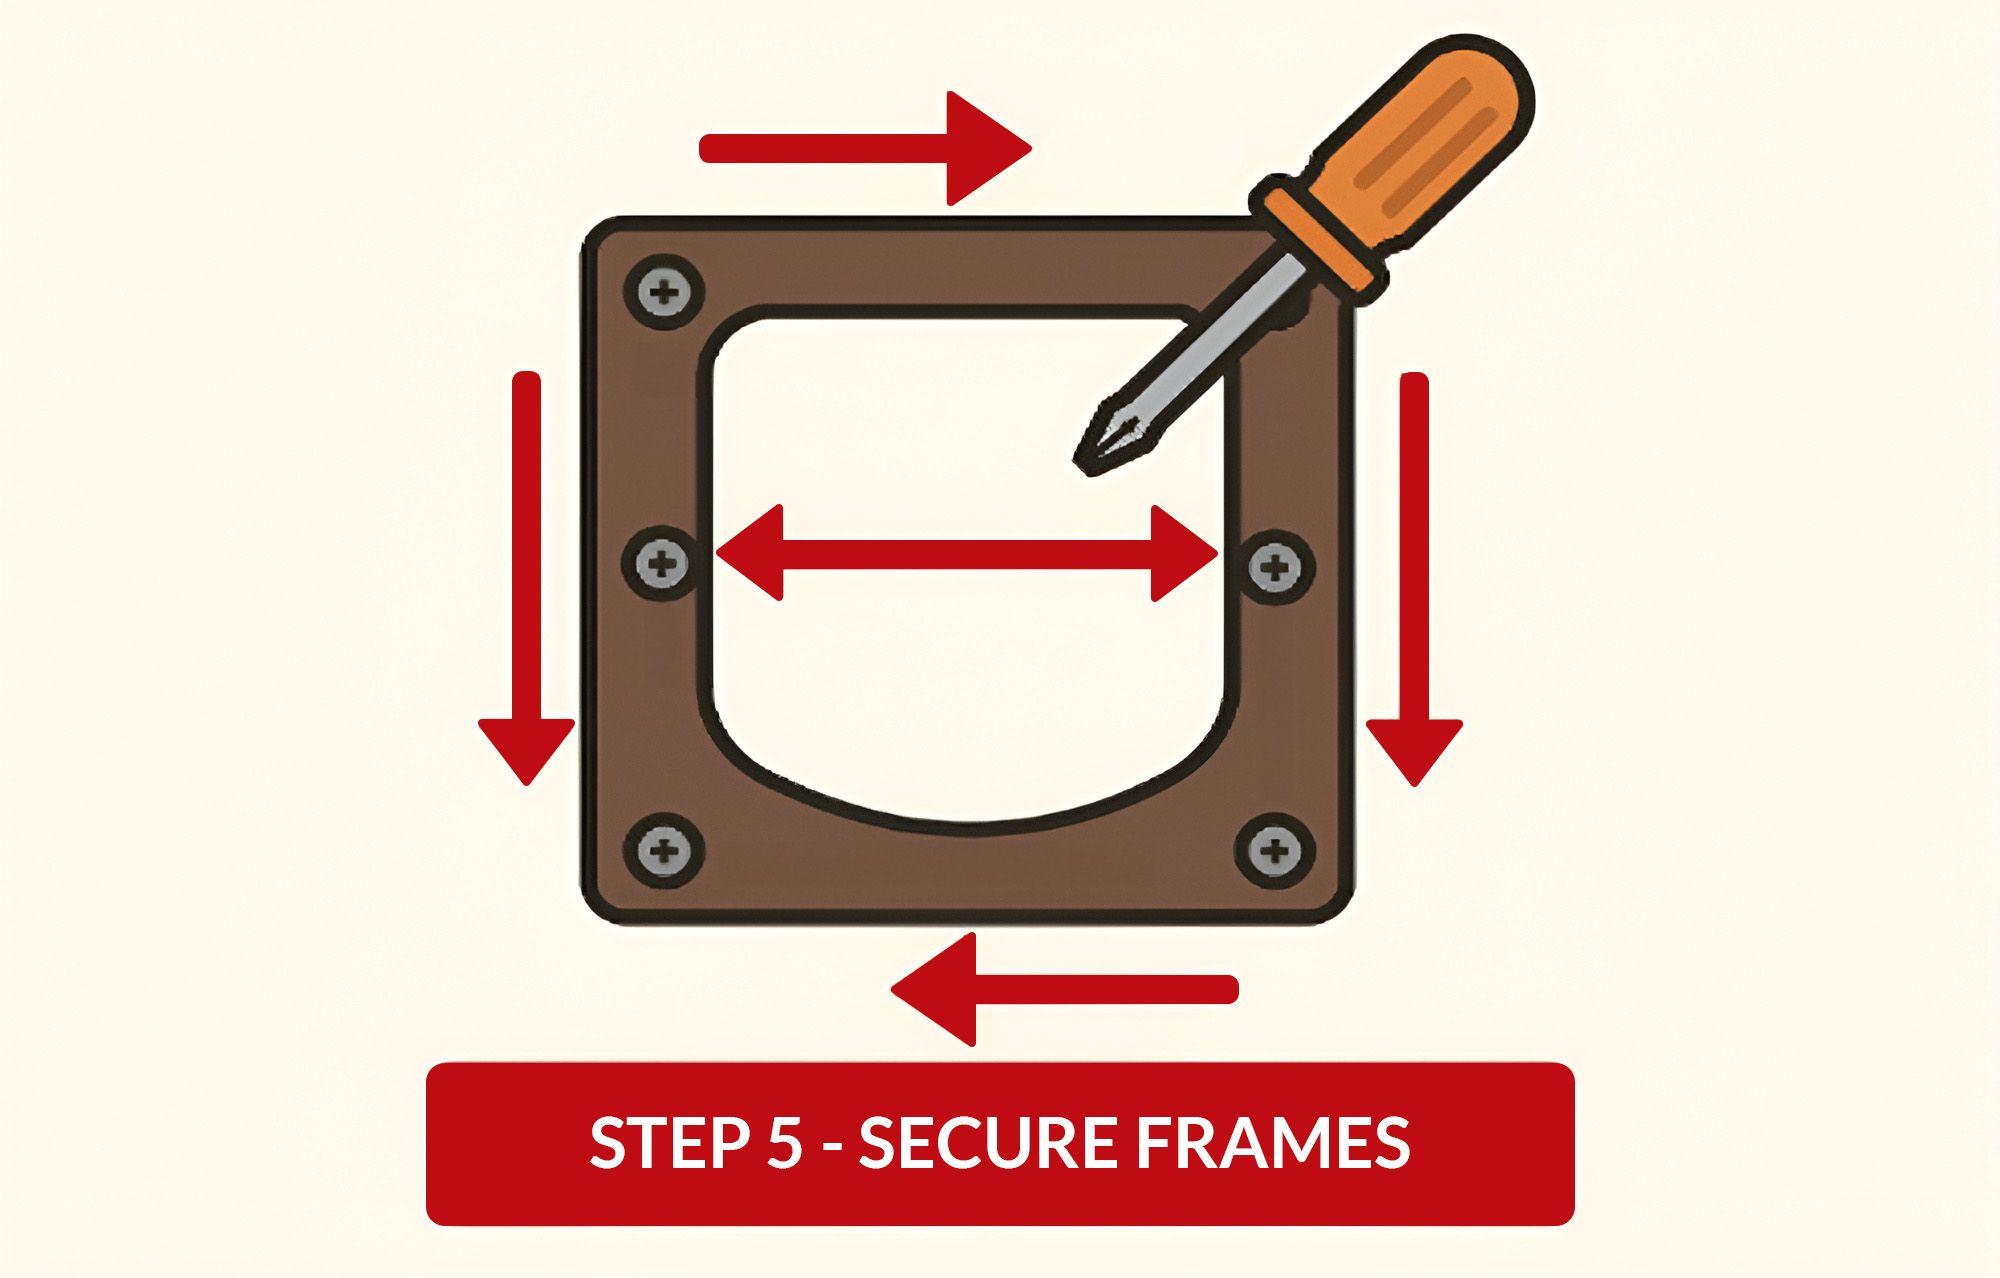
Step 5 - Secure the frames together
Insert the screws provided and tighten gradually. Alternate between screws on opposite sides to keep the frame even. Avoid over-tightening, which can warp plastic frames or strip screws.
Step 6 - Seal with caulk and add weatherstripping
Run a bead of silicone caulk around the edges of the exterior frame. Apply weatherstripping if included in the kit. This step prevents drafts and water leaks.

Common Mistakes to Avoid While Installing a Dog Door in Door
- Placing the door too high or too low: pets may refuse to use it if it feels awkward.
- Overtightening screws: this can crack or distort the frame.
- Skipping caulking: leaving the edges unsealed often results in leaks and drafts.
How to Install a Wall-Mounted Pet Door - Step-by-Step
Wall-mounted pet doors are a great choice if you don’t want to alter your main entry doors or if the layout of your home makes a direct wall passage more practical. These installs are more advanced than door-mounted versions since you’ll be cutting through drywall, insulation, and exterior siding.
Wall Mounted Pet Door - Installation Steps
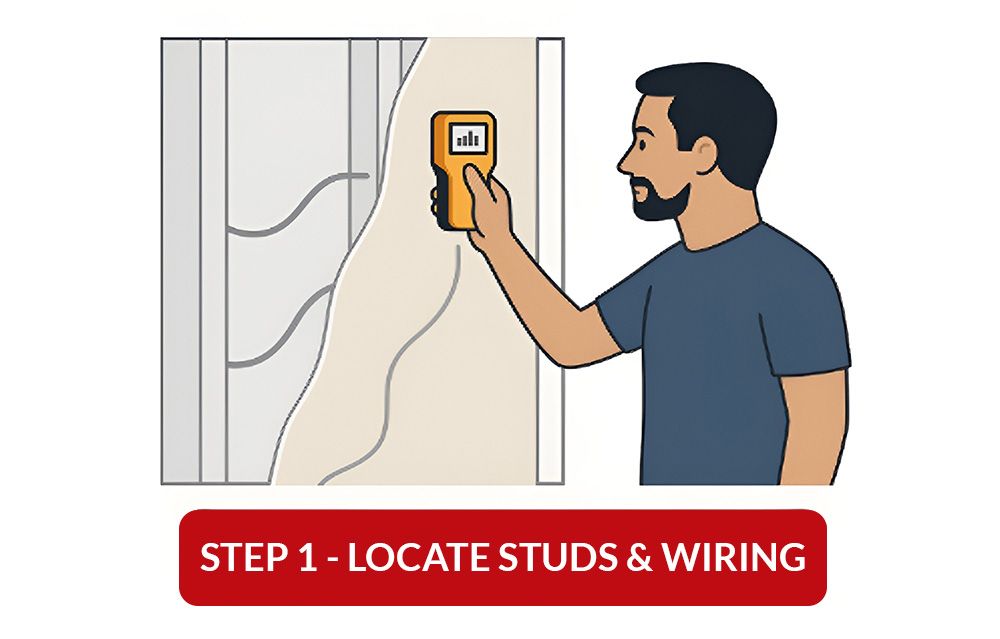
Step 1 - Locate studs and wiring with a stud finder
Choose a spot between studs and confirm there are no wires or plumbing lines. Avoid structural framing.
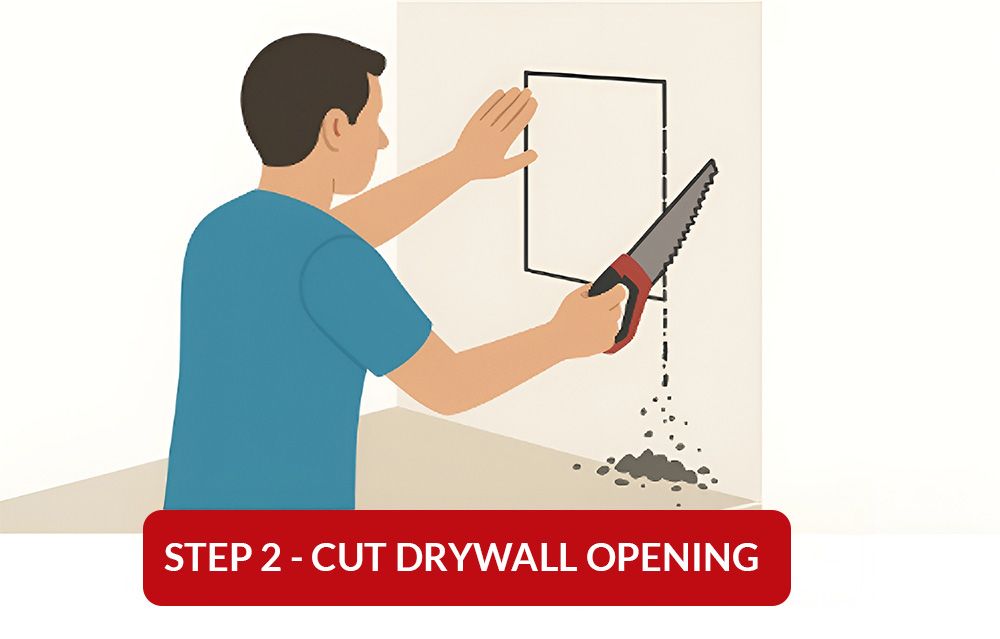
Step 2 - Cut the interior drywall opening
Trace the template at the correct height. Drill pilot holes and cut the outline with a drywall saw.
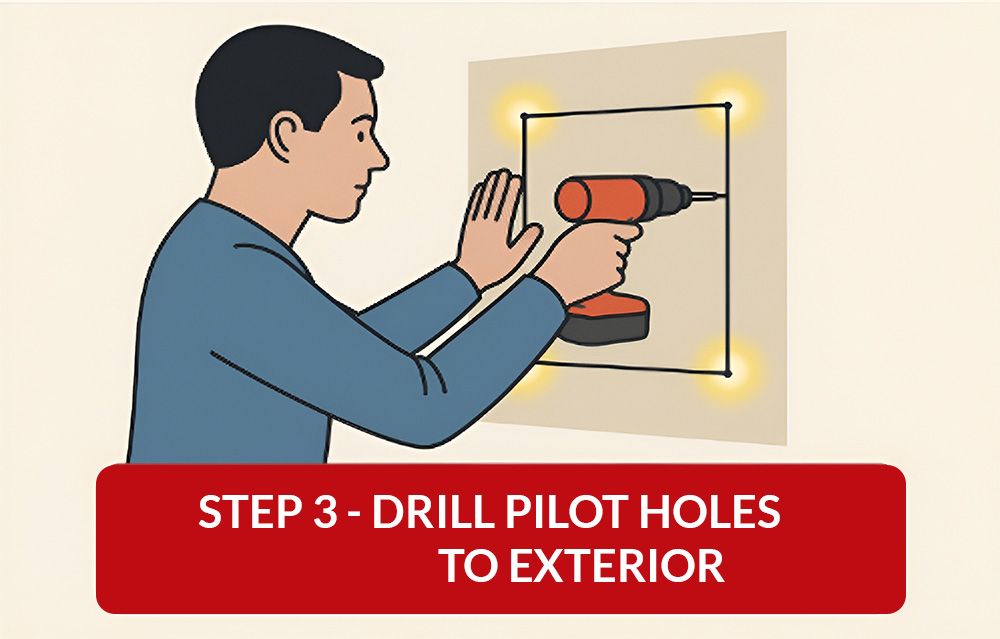
Step 3 - Drill pilot holes to the exterior
At each corner of your cutout, drill through to the outside. These holes mark your exterior cut lines.
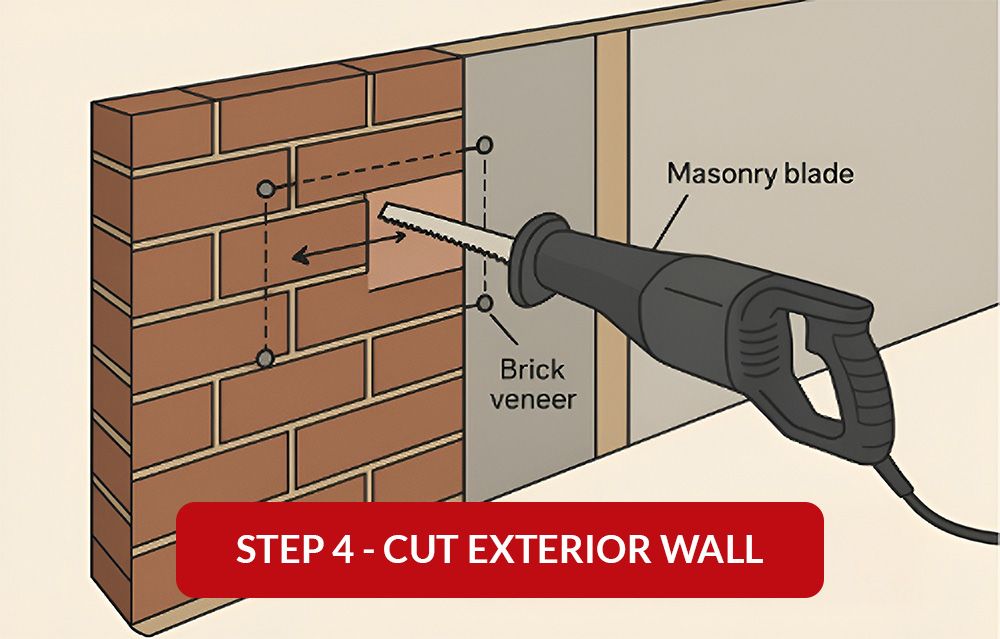
Step 4 - Cut the exterior wall
From the outside, connect the pilot holes and cut the opening. Use the right blade: wood blade for siding, masonry blade for stucco or brick.
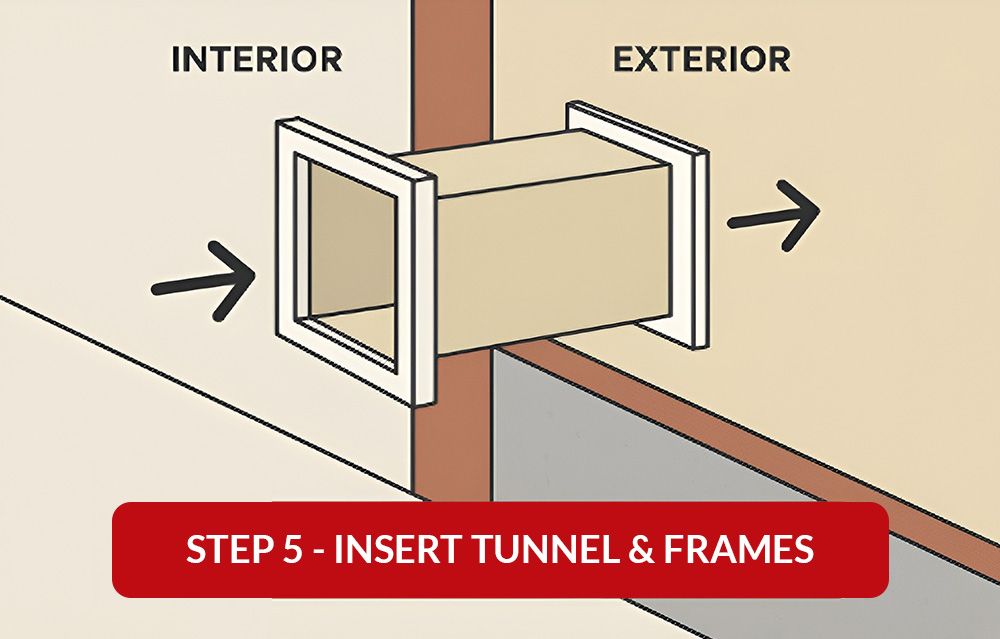
Step 5 - Insert tunnel kit and frames
Slide the tunnel piece through the wall cavity. Fit the interior and exterior frames into place.
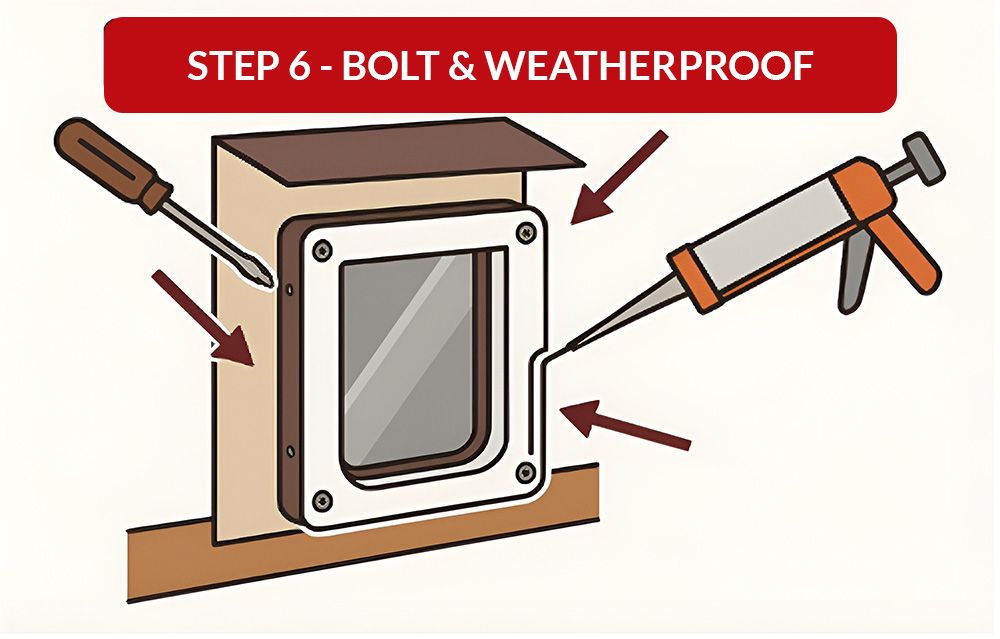
Step 6 - Bolt together and weatherproof inside and out
Secure the frames with the provided screws or bolts. Seal the perimeter with exterior-grade silicone caulk. Add flashing or trim for extra protection against rain.
Pro Tips For Installing Pet Door on Walls
- Add blocking (2x4 framing) inside the wall for large or heavy-duty pet doors.
- Always seal edges carefully to prevent drafts and moisture damage.
- For brick or stucco, take extra time and use protective gear- cutting can be dusty and loud.
Sliding Glass Door Pet Panel - No-Cut Install (Best for Renters)
Sliding glass door pet panels are the easiest option for renters or anyone who doesn’t want to cut into doors or walls. These panels fit directly into the existing sliding door track, providing a flap for your pet at the bottom. Best of all, they can be removed without leaving permanent marks.
Sliding Glass Door Pet Panel - Installation Steps
Measure the track height
Measure from the inside of the bottom track to the inside of the top track. Choose a panel that fits this range - most are spring-loaded for adjustment.
Insert the panel into the track
Tilt the panel, insert the top into the upper track, then swing the bottom into the lower track. Release so the spring mechanism holds it snug.
Secure with adhesive brackets or screws
For renters, use adhesive brackets supplied with the kit. Homeowners can screw brackets into the frame for added stability.
Apply weatherstripping
Place the provided weatherstrip along the edge where the sliding door meets the panel. This reduces drafts and keeps insects out.
Lock with a charley bar or track dowel
Most panels come with a lock adapter, but adding a charley bar or wooden dowel in the track is an easy security boost.
Benefits of Installing a Sliding Glass Door Pet Panel
- No cutting or drilling required.
- Fully removable - ideal for renters.
- Quick installation, often under 20 minutes.
- Works with most standard sliding doors.
Pet Door Installation: Quick Troubleshooting (After Install)
Even with a careful installation, minor issues can arise. Addressing them quickly ensures your pet door stays secure, energy-efficient, and easy for your pet to use.
If the flap won’t close properly
- Check if the frame is level and square. An uneven frame can cause the flap to stick.
- Inspect the magnets at the bottom, if they’re misaligned, reposition them so the flap seals tightly.
- Clear away any debris or dirt that may be obstructing the flap’s swing.
Drafts or water leaks
- Reseal the perimeter with a fresh bead of silicone caulk.
- Add or replace weatherstripping where gaps appear.
- Ensure the tunnel or frame is flush with the wall or door surface to block airflow.
Pet hesitant to use the door
- Prop the flap open with tape for the first few days so your pet sees a clear path.
- Use treats or toys to encourage your dog or cat to pass through.
- Offer praise each time they use it to build confidence.
Taking a few minutes to troubleshoot keeps your installation working as intended and helps your pet feel comfortable using their new door.
What are the Safety, Weather & Security Precautions That You Must Take While Installing Pet Doors?
Adding a pet door also means adding a new opening to your home. To keep your household safe, comfortable, and energy-efficient, it’s important to think beyond the basic install.
How Can You Lock Pet Doors?
- Locking panels: Most quality pet doors include a slide-in panel that blocks access when you’re away or at night. Always use this feature for added peace of mind.
- Electronic or microchip doors: Advanced models only open for pets wearing a sensor collar or with a registered microchip. This prevents stray animals from coming inside.
Weatherproofing & Insulating Pet Doors
- Double or triple flap doors: These provide better insulation, reducing heat loss in winter and blocking hot air in summer.
- Magnetic seals: Ensure flaps close tightly after each use, cutting down on drafts.
- Proper caulking: Even the best door will leak air if edges aren’t sealed correctly. Exterior-grade caulk keeps moisture and wind out.
How to Keep Your Pet Door Safe & Secure?
- Install the door at the correct size - oversized openings are harder to secure.
- For larger dog doors, consider additional fencing or yard security since bigger flaps could be misused.
- Regularly inspect for wear and tear; damaged flaps or loose frames can reduce both security and energy efficiency.
By combining a solid installation with smart security and insulation upgrades, you’ll have a weatherproof pet door that’s safe, durable, and comfortable for your pet to use year-round.
Pet Door Installation: Sizing & Selection Guide
Choosing the right size and style of pet door is just as important as the installation itself. A properly sized door ensures your pet uses it comfortably and keeps your home better protected from drafts and weather.
How To Measure Walls/Doors To Install a Pet Door?
- Height: Measure your pet’s shoulder height and add 2 inches. This gives enough clearance so they don’t crouch uncomfortably.
- Width: Measure the widest part of your pet (usually chest or hips) and add 2 inches.
- Step-over: The distance from the floor to the bottom of the opening should be no more than one-third of your pet’s height. This prevents joint strain, especially in older pets.
When to Use Which Type of Pet Door?
- Door-mounted: Best for quick installs and direct backyard access.
- Wall-mounted: Ideal when a door location isn’t convenient; allows access to side yards or patios.
- Sliding glass panels: Perfect for renters or temporary setups.
- Insulated options: Recommended for extreme climates to reduce heat or cold transfer.
Let’s talk about Different Pet Door Materials
- Plastic frames: Lightweight and affordable, good for smaller pets or low-traffic use.
- Aluminum frames: Stronger and more durable, suited for larger or more active pets.
- Single flap: Standard option, easier for small pets.
- Double or triple flap: Provides better insulation and weather protection.
Taking the time to measure correctly and match the right product to your home’s needs ensures long-term success and comfort for your pet.
Full Tools & Materials Checklist - Pet Door Installation
Having the right tools on hand before you begin makes installation faster and reduces mistakes. Below is a checklist grouped by installation type. You can print this out and use it as a prep guide before starting your project.
Tools & Supplies Need For for All Kinds of Pet Door Installation
- Painter’s tape
- Utility knife
- Level
- Drop cloth
Tools and Supplies Need For Different Kinds of Pet Door Installation
It’s a Wrap - How to Install a Pet Door?
Installing a pet door is one of those projects that pays off immediately. Once the flap is in place, your dog or cat gains the freedom to come and go, and you save time from constant door duty. With options for standard doors, walls, and sliding panels, there’s a solution for every type of home - whether you own or rent.
Most DIYers find that installing a dog door yourself is simpler than expected. With the right tools, careful measuring, and proper sealing, the entire process can be done in a single afternoon. Even more advanced installs, like wall-mounted models, are manageable when broken into clear steps.
A secure, weatherproof pet door improves your pet’s comfort and can even enhance your home’s energy efficiency when installed correctly. Plus, features like locking panels or electronic microchip access give you extra peace of mind.
If you’re ready to get started, explore the wide selection of Pet Supplies available at DK Hardware. From basic flaps to insulated and electronic models, you’ll find everything you need to match your home, your climate, and your pet’s needs.