
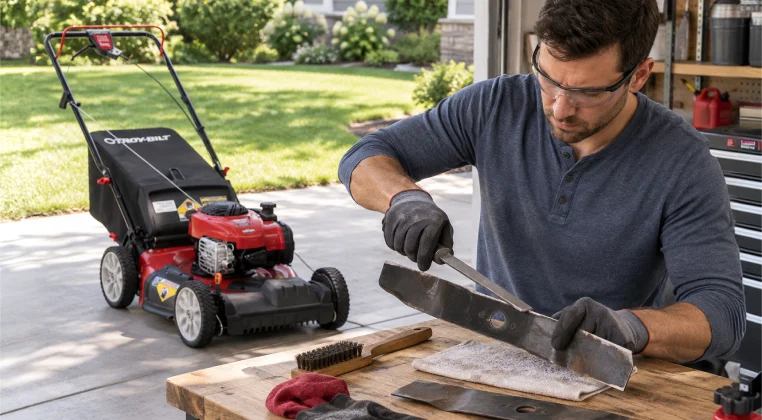



You chose the right lawn mower a year or two back – but that isn’t enough. If your lawn still looks rough after mowing torn tips, patchy areas, or a brown tinge showing up within a day of cutting, the blade is almost certainly the problem. A dull blade tears grass instead of slicing it, and those torn tips are what turn brown overnight. What most people don’t realize is the damage doesn’t stop at the lawn. The extra load from a dull blade wears down your mower’s spindle bearings over time, and bearing repairs cost a lot more than a sharpening.
Most homeowners run a full season without ever checking the blade. This guide covers exactly how to sharpen it, how to know when sharpening isn’t enough anymore, and how to replace it when that time comes.,
Quick Answer
Sharpen your lawn mower blade every 20–25 hours of mowing time using a mill bastard file, angle grinder, or bench grinder at a 30–45 degree bevel angle. Always balance after sharpening. Replace the blade if it is bent, cracked, has deep structural nicks, or has been sharpened more than 4–5 times and the cutting edge is getting thin.
Signs Your Lawn Mower Blade Needs Sharpening
Your lawn will tell you before the mower does. Here’s what to look for:
- Torn or frayed grass tips – instead of a clean cut, the grass looks shredded or jagged
- Brown tips within 24–48 hours of mowing – torn grass dries out fast and turns straw-colored
- Patchy or uneven cut – some strips look cut, others look untouched
- More vibration than usual – a dull blade creates uneven resistance across the deck
- The engine sounds like it’s working harder – especially noticeable in thicker patches of grass
- You’re slowing down without realizing it – this one catches people off guard, but it’s common
Two or more of these together is your cue to pull the blade and have a look before the next mow.
3 Methods to Sharpen a Lawn Mower Blade
Clean off grass and debris with a wire brush before you start, then inspect the blade carefully for cracks or bends. If it passes, pick your method.
Method 1: Metal File
Best for: Light dulling, no power tools, first-timers. Slower but gives you the most control.
- Clamp the blade in a vise, cutting edge up
- Use a 10-inch mill bastard file
- Match the file angle to the existing bevel, usually 30 to 45 degrees
- File in one direction, center to tip, with consistent pressure
- Count your strokes and do the same number on both ends – this matters for balance
- You’re done when you feel a consistent burr forming along the back edge
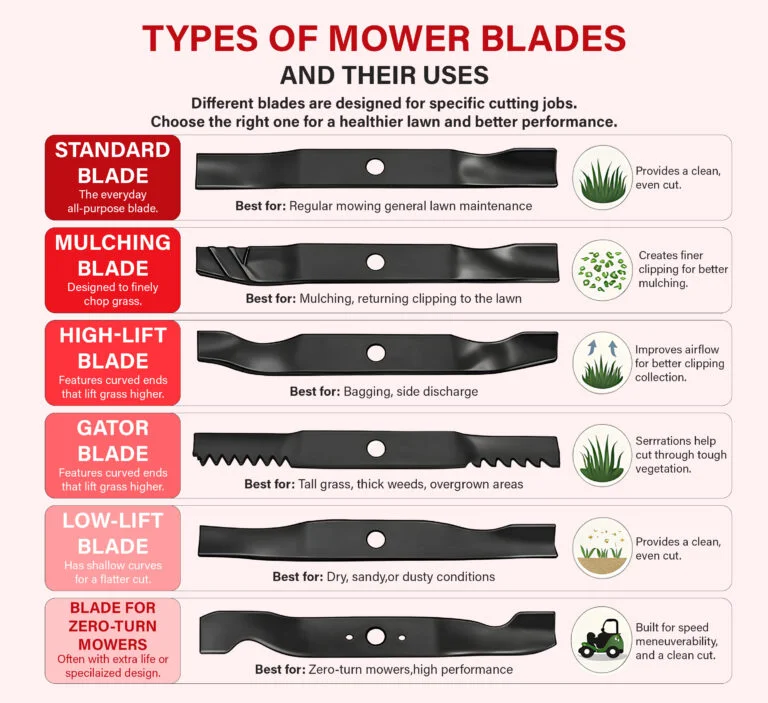
Mulching blades: don’t just work the primary bevel. These blades have multiple cutting edges along the curved body – go over the full surface.
Method 2: Angle Grinder
Best for: Heavier nicks, multiple blades, anyone comfortable with power tools. Fastest field method by a wide margin.
- Use an 80-grit flap disc, not a grinding wheel. More control, less aggressive
- Clamp the blade firmly in a vise
- Work in short, smooth passes at the bevel angle, don’t hold the grinder in one spot
- Blue discoloration means you’ve overheated the steel and weakened its temper. If you see it, you’ve gone too far
- Keep a bucket of water nearby and dip the blade regularly
Mulching blades: make additional passes along the secondary curved edges. Same overheating risk throughout.
Method 3: Bench Grinder
Best for: Workshop use, sharpening multiple blades regularly, the most repeatable results.
- Use a medium-grit aluminum oxide wheel
- Set the tool rest to your bevel angle before touching the blade to the wheel
- Move the blade smoothly across the wheel with light, consistent pressure
- Cool it frequently in water
The tool rest is what makes a bench grinder worth it, it holds your angle consistently in a way a hand-held grinder can’t match.
How Often Should You Sharpen Your Lawn Mower Blade?
The general rule is every 20 to 25 hours of mowing. For most homeowners cutting a standard suburban lot once a week, around 30 to 45 minutes a session, that works out to once per season, typically right before spring growth kicks in.
That said, mowing hours aren’t the whole story. A few things will wear your blade down faster than the clock:
- Rocky or root-heavy ground – this is the big one. One solid rock strike can nick a blade badly enough to need immediate sharpening
- Coarse grass types like Bermuda or Zoysia – these dull a blade faster than fine fescues
- Large properties – a one-acre lawn accumulates hours quickly and will likely need a mid-season sharpening
- Cutting too low – scalping brings the blade close to soil and debris
A simple way to track it: note your average mowing time and how often you mow. Thirty minutes twice a week is an hour per week, you’ll hit 20 hours in about five months. At that pace, two to three sharpenings a season makes sense.
Check the blade at the start of each season, mid-season after heavy use, and immediately after you hit anything solid.
How to Remove the Blade Safely?
Don’t skip any of these steps. Blade removal injuries almost always happen because someone rushed this part.
- Cut the power completely – disconnect the spark plug wire on gas mowers, pull the battery on electric or cordless models. This is not optional
- Position the mower correctly – tip walk-behind mowers with the air filter and carburetor facing up so oil doesn’t flood the engine. On a riding mower, use a floor jack with proper jack stands. Never crawl under a machine supported only by a jack
- Wear heavy duty gloves – a dull blade still cuts skin without any effort
- Block the blade – wedge a piece of wood between the blade and the deck so it can’t spin while you’re working on the bolt
Which way to turn the bolt:
When you put a wrench on the blade bolt, turn it counter-clockwise to loosen, the same direction as any standard bolt. That’s it.
The confusion comes from a myth that spreads around lawn mower forums: that blade bolts are reverse-threaded so the blade’s spinning doesn’t unscrew them. On almost every mower made today, Honda, Toro, Husqvarna, Craftsman, that’s not true. The bolt is standard. It just feels like it should turn the other way because operation tightens it down hard.
A small number of older machines do use reverse threading, where you’d turn clockwise to loosen. If you’re working on a vintage mower and the bolt absolutely won’t budge counter-clockwise, check your owner’s manual before applying more force.
If the bolt won’t budge:
Spray penetrating lubricant on the bolt, wait 15 to 20 minutes, then try again with a breaker bar or impact wrench. The extra leverage usually handles it. What you want to avoid is cranking hard at an awkward angle, if you round off the bolt head, removing it becomes a much bigger job than sharpening ever was.
What Angle Should You Sharpen a Lawn Mower Blade?
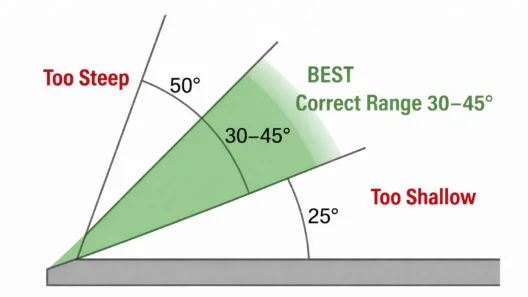
Stay between 30 and 45 degrees. Most blades come from the factory at around 30 degrees, which is a solid all-around angle, sharp enough to cut cleanly, and durable enough to last.
Going shallower than 25 degrees gives you a finer edge that chips faster. Going steeper than 45 degrees gives you a more durable edge that doesn’t cut as well. Neither extreme is worth chasing.
The most important thing isn’t hitting a specific degree – it’s matching the angle that’s already on the blade. Regrinding to a new angle removes more metal than necessary and shortens blade life. An inexpensive angle gauge or bevel protractor keeps you honest, especially when using a grinder.
Three Common Mistakes that cost people a good sharpening job:
- Sharpening too steep and creating a feather edge that folds over on the first pass
- Drifting angle mid-pass without realizing it, leaving an uneven bevel
- Taking more metal off one end than the other – the imbalance will be obvious the second you start the mower
How to Balance the Blade After Sharpening?
This is the step most people skip. It’s also one of the most important.
Every time you sharpen, you remove metal. Take slightly more off one end and that side gets heavier. At 3,000 RPM, even a few grams of imbalance creates vibration that hammers the spindle shaft and bearings. You won’t always feel it immediately, but it adds up into expensive repairs.
- Nail method: Drive a nail into a wall or workbench at a slight upward angle. Hang the blade by its center hole. If one end drops, that side is heavier. File a little off the cutting edge of the heavy side and check again. Repeat until it sits flat.
- Blade balancer: A cone or magnetic balancer does the same thing more accurately and costs $5 to $15. Worth having, especially if your blade has a star-shaped center hole that doesn’t hang cleanly on a nail.
How to Reinstall the Blade?
- Get the orientation right – the cutting edge faces the direction of rotation. Most blades say “This Side Down.” On mulching blades, the curved fin curves up toward the deck
- Torque it properly – walk-behind mower blade bolts typically need 35 to 50 ft-lbs. Riding mower bolts usually run higher, around 50 to 65 ft-lbs. Your owner’s manual has the exact spec – use it
- Use a torque wrench – guessing here is not worth the risk. A blade coming loose at speed is genuinely dangerous
- Reconnect power last – spark plug wire or battery goes back on only after the blade is secured and you’re clear of the deck
How Much Does Sharpening Cost?
| Tool | Cost Level | Notes |
| Mill bastard file (10″) | Low -one-time purchase | Lasts dozens of sharpenings |
| Blade balancer | Low – one-time purchase | Cone or magnetic style |
| Angle grinder | Medium – one-time purchase | Flap discs are the ongoing consumable cost |
| Bench grinder | Medium to High – one-time purchase | Best value for regular, high-volume use |
If you’d rather have it done professionally, most hardware stores and small engine shops charge a modest flat fee per blade and typically include balancing. For a single mower sharpened once a season, that’s a perfectly reasonable call. If you’re running multiple mowers, investing in a bench grinder pays for itself quickly. Shop DK Hardware’s full range of sharpening tools and mower accessories to find the right setup for your situation.
Signs You Should Replace the Blade Instead
Sharpening fixes a dull edge but it can’t fix a damaged blade. If you find any of the following, stop, this blade needs to be replaced, not sharpened:
- Cracks or fractures anywhere in the blade body. This is non-negotiable, replace the blade immediately
- Any bend at all – even a slight bend causes dangerous vibration. You cannot safely straighten a bent mower blade in the field. Running one risks the blade breaking apart at speed
- Deep nicks below the cutting bevel – if the chip extends into the body of the blade rather than just the edge, there’s no safe way to file it out
- An edge that’s gone paper-thin – repeated sharpening removes metal each time. When the edge measures less than about 3mm (⅛ inch) thick, or flexes under light thumb pressure, it’s done
- Fourth or fifth sharpening – at this point the blade has lost enough thickness and balance that replacement is the smarter call regardless of how the edge looks
A good rule of thumb: if clearing a nick would require removing more than ¼ inch of metal, a new blade is cheaper and faster than continuing to grind.
How to Replace a Lawn Mower Blade?
Removal is the same process as above. Here’s what you need to know about finding the right blade and getting it on correctly.
Getting the right replacement:
Your mower’s model number is on a sticker under the deck or on the engine housing. Use that to look up the correct blade through the manufacturer’s parts finder – don’t guess on dimensions. You need to match blade length, center hole pattern (round, star, or adapter-specific), and thickness. OEM blades are the safest bet for fit. Aftermarket blades can work well but verify the hole pattern before you buy.
Walk-behind blades typically run 16 to 22 inches. Riding mower decks use 18 to 22-inch blades, and most take two or three depending on deck width.
Installing it:
- Orient the blade with the cutting edge facing the direction of rotation, stamped markings facing down
- Start the bolt by hand to make sure it threads cleanly, cross-threading here is an expensive mistake
- Use the wood-block method to hold the blade while you torque the bolt
- Torque to spec, then check balance before the first use
Riding mower specifics:
Use rated jack stands, not just a floor jack. Engage the parking brake and pull the ignition key before going under the deck. If you’re replacing one blade, replace them all if they’ve seen similar use, mixing a fresh blade with worn ones gives you an uneven cut across the full deck width. After installation, check blade tip clearance at every deck position before mowing.
Quick Reference: Sharpen or Replace?
| Blade Condition | Action |
| Dull but intact | Sharpen |
| Small nicks on the cutting edge | Sharpen |
| Edge under 3mm (⅛”) thick | Replace |
| Visibly bent | Replace immediately |
| Cracked or fractured | Replace immediately |
| Deep nicks below the cutting bevel | Replace |
| Sharpened 4–5 times already | Check thickness – replace if edge is thin |
| New blade feels slightly dull | Light sharpen or leave as-is |
| Vibration persists after sharpening and balancing | Inspect carefully – likely replace |
Frequently Asked Questions
Every 20–25 hours of mowing time, or at the start of each season at minimum. Rocky ground or a debris strike bumps that up regardless of hours.
You can, but it’s not worth it. Off the mower you can hold a consistent angle, check the blade properly for damage, and balance it when you’re done. Trying to sharpen it in place gets you inconsistent results and skips the balance check entirely.
Most aren’t. Honda, Toro, Husqvarna, Craftsman – all standard thread, counter-clockwise to loosen. It just feels stubborn because operation tightens it. A handful of older models are reverse-threaded, so check your manual if you’re dealing with an older machine.
Hang it by the center hole on a nail or balancer. If one side dips, file a little off the cutting edge of the heavy side and recheck. When it sits flat, you’re good.
Two to four seasons with regular sharpening and no serious impacts. If a blade has been sharpened four or five times and the edge looks thin, it’s time regardless of age.
Three to five times is the typical range. The real signal isn’t the count, it’s the edge thickness. When it gets down to 3mm (⅛ inch) or thinner, or you can feel it flex, replace it.
They come with a working edge, not a precision one. A light pass with a file before the first use doesn’t hurt. Always check balance before installing a new blade, factory balance on budget replacements can be inconsistent.
Floor jack and rated jack stands, parking brake on, key out before you go under the deck. Most decks take two or three blades, replace them together if they’ve seen similar use. Torque specs are typically 50–65 ft-lbs on riding mowers, but verify in your manual.
Closing Thoughts!
A sharp, balanced blade is one of the simplest things you can do for your lawn and one of the most neglected. Sharpen when the blade is dull but solid. Replace when it’s bent, cracked, or the metal has been ground down too far. Balance every time and torque the bolt properly on the way back in.
DK Hardware carries replacement blades, sharpening tools, blade balancers, and torque wrenches. Shop the full range of lawn mower maintenance equipment and keep every blade in your lineup doing its job.